


If you missed our Home for the Holidays 2022 crafting event at our store, you can still make these 2 projects from your home. Our adorable DIY Pine Gnome & fun DIY Wood Bead Tree crafts would make great additions to your Christmas decorations. Just come in to get the supplies, and follow the simple instructions below.
Use our “Printing” feature to print a hard copy. It makes it easier to follow along as you’re creating the projects. If you have any questions, you can stop by any time to talk to our friendly staff.
(Supplies may vary by store, however, special store-to-store orders can be placed with a one-week turnaround. Substitutions will be suggested if a product is no longer available.)
4” Wood Disk
Floral Pine Pick
Wood Ball 3/4”
Jute
Wood Snowflakes
Fat Quarter Fabric
Glue Dots
Stapler
1. Apply Glue Dots to the wood disk and press the floral pine pick firmly on the dots.
2. Cut your fat quarter piece of fabric into 4 equal pieces, roughly 9″ x 11” each. (you’ll have 4 fabric pieces to make 4 gnomes)
3. On the short side of the fabric piece, fold under about 1/2” and wrap around the wood disk. Staple to the back.
4. Slightly bend the stem of the pine pick and gather the fabric at the end. Tie with a piece of jute. (see our model for reference)
5. Apply the wood ball where desired for the nose using Glue Dots.
6. Embellish with wood pieces as desired. We added wood snowflakes.
(Supplies may vary by store, however, special store-to-store orders can be placed with a one-week turnaround. Substitutions will be suggested if a product is no longer available.)
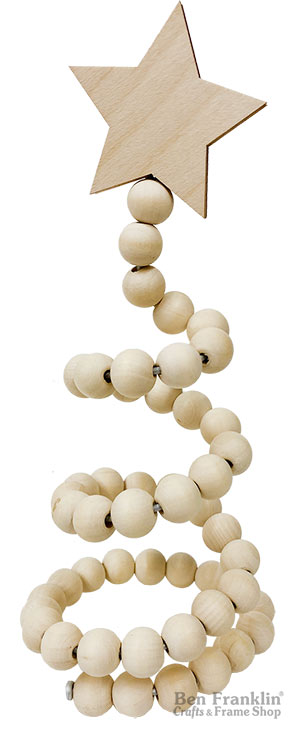
1/8in Armature Wire
Wood Beads
2 Wood Stars 3”
Permanent Glue Dots
Wire Cutters
Pliers
Foam Cone
1. Cut a 36” piece of armature wire and make a small loop at on end with pliers. This will stop the beads from sliding off. Make sure the wire is straight.
2. String on your wood beads. We used approximately 52 beads. Leave about an inch of wire at the top. Create another loop with the wire to hold the beads on.
3. Use a foam cone to wrap the beaded wire around to create a tree shape. Remove the cone and adjust as needed to get the desired look.
4. Using Glue Dots, apply one to the bottom of each star and stick them together at the top of the tree on the wire loop.

Huge savings offered throughout both our Bonney Lake and Monroe stores.