Did you know that this month is March National Craft Month? Here at our Ben Franklin Crafts and Frame Shop store in Bonney Lake, WA, we put together some fun crafting ideas that we hope will inspire you to create at least one or two crafts during the month.
These 5 projects are all very simple to make. In this post, we will list the supplies you’ll need, and also give you a brief description on how to make the craft. If you have any further questions, please stop by our store in Bonney Lake, WA, to talk with our friendly staff. They will be happy to help you find all the supplies you need, and review the project with you to make sure you understand how to make it. Our goal is to assure your success with the projects you’re working on.

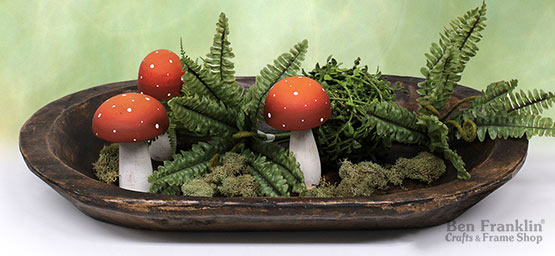
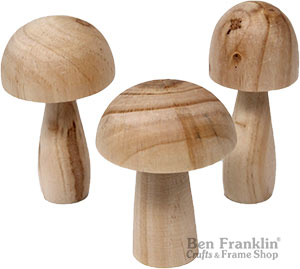
DIY Wood Mushrooms Tray Centerpiece
Here are the supplies needed to make a DIY Wood Mushrooms Tray Centerpiece
(Supplies may vary by store, however, special store-to-store orders can be placed with a one-week turnaround. Substitutions will be suggested if a product is no longer available.)
Unfinished Wood Mushrooms
Acrylic Paint (color of your choice)
Paint Brush
Dough Bowl (many sizes to choose from)
Artificial Boston Fern
Moss
Basic Instructions:
Paint the mushrooms. Look at our model for ideas. Let them dry completely. Place your moss pieces in the bottom of the dough bowl, add the mushrooms. Place the fern to fill the tray.
DIY Tulip Welcome Pallet Sign
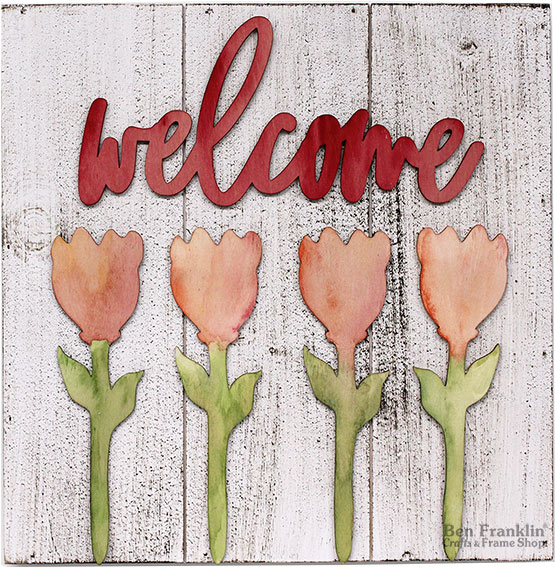
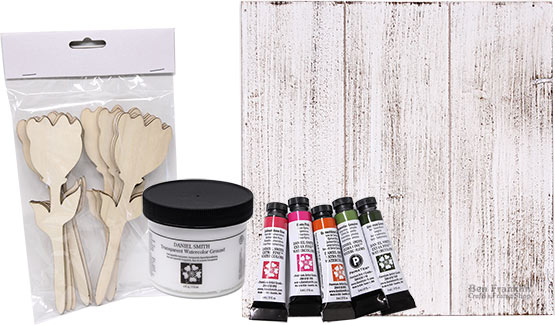
Here are the supplies needed to make a DIY Tulip Welcome Pallet Sign:
(Supplies may vary by store, however, special store-to-store orders can be placed with a one-week turnaround. Substitutions will be suggested if a product is no longer available.)
12″ Whitewashed Pallet
Wood Tulips (set of 12)
Unfinished Welcome Cut-Out
Daniel Smith Transparent Watercolor Ground
Daniel Smith Watercolor Paints
Paint Brush
E6000 Glue
Basic Instructions:
Brush on the Watercolor Ground on your tulips and welcome cut-out pieces. (Follow the instructions on the jar for application). When ready, paint them with watercolor paint. As you can see, the Watercolor Ground gives any surface a new texture which is similar to watercolor paper! Imagine all the possibilities! You can now paint watercolor art on any surface!
Once dry, glue your pieces to the Whitewashed Pallet using E6000 glue.
DIY Hello Sunshine Sign
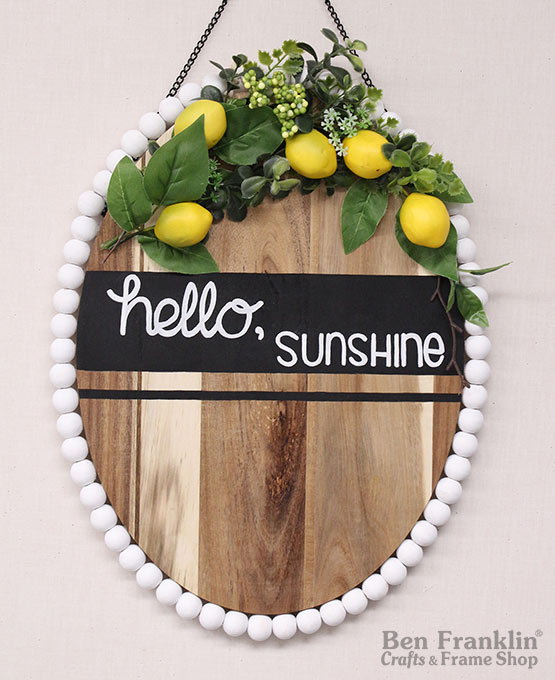
Here are the supplies needed to make a DIY Hello Sunshine Sign:
(Supplies may vary by store, however, special store-to-store orders can be placed with a one-week turnaround. Substitutions will be suggested if a product is no longer available.)
15″ Oval Wood Plaque
Unfinished Wood Bead String
E6000 Glue
Acrylic Paints (white & black)
Paint Brush
Ruler (or masking tape)
POSCA Paint Pen (white)
Lemon Floral Picks
Basic Instructions:
Use a ruler to create lines where you want the black to be. Or use masking tape to keep lines straight. Brush on black acrylic paint to those sections. Let that dry completely. Use a white POSCA paint pen to write your message.
Paint your wood beads with the white acrylic paint. Let dry. Adhere them to the outer edge of the oval wood plaque using E6000 glue. Don’t move it for several minutes to make sure it dries in place. Finish your plaque by gluing the faux lemons to the upper section. Let dry again before moving it. Enjoy!
DIY Fabric-Covered Wood Bunny
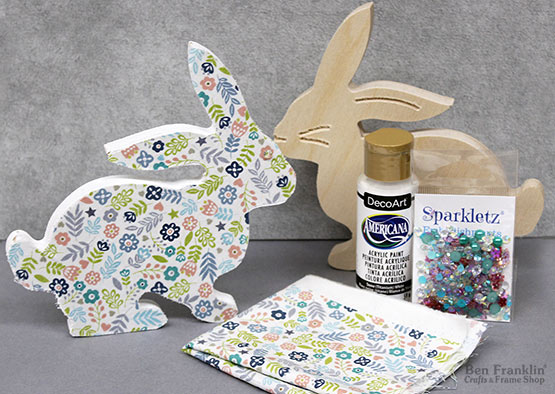
Here are the supplies needed to make a fabric-covered wood bunny:
(Supplies may vary by store, however, special store-to-store orders can be placed with a one-week turnaround. Substitutions will be suggested if a product is no longer available.)
6.5″ Unfinished Wood Rabbit
Acrylic Paint (white)
Paint Brush
Fabric (A fat quarter is the perfect size!)
Ranger Multi-Medium (quality acrylic gel medium that can be used as a super strong adhesive, acrylic paint extender or sealer.)
Embellishments Sparkletz
Basic Instructions:
Place the wood rabbit on your piece of fabric. Trace the outline with a pen or pencil to create a template. Remove the rabbit. Cut the fabric on that line.
Paint the rabbit using white acrylic paint. You don’t need to paint the entire front since the fabric will cover that part. But we still recommend to paint at least 1/2″ inside that border to make sure you don’t see any of the unfinished wood after your fabric is in place. Let dry.
Apply the Ranger Multi-Medium to the front of the rabbit. (Read the instruction on the jar for best results). Place the wrong side of the fabric where you brush on the Multi-Medium. Softly move the fabric to make it fit. If there is extra fabric, you can use an Exacto knife to remove the excess.
Use your favorite glue to adhere the Sparkletz buttons to your bunny to add some bling!
DIY Moon and Star Wall Art Plaque
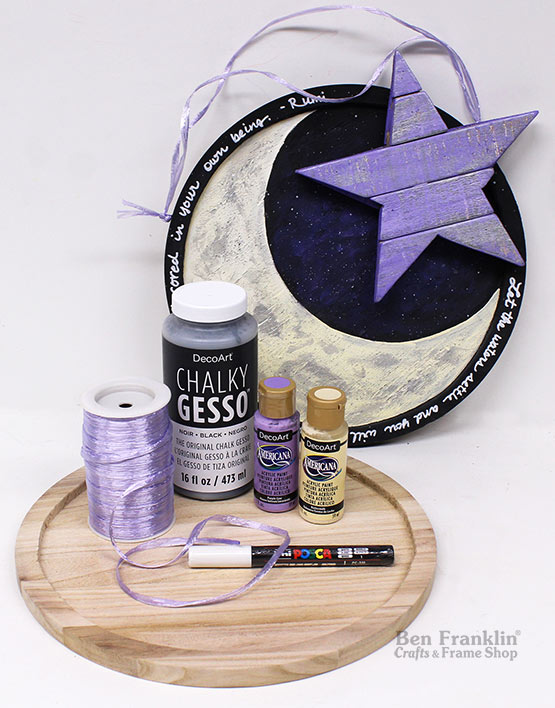
Here are the supplies needed to make a Moon and Star Wall Art Plaque:
(Supplies may vary by store, however, special store-to-store orders can be placed with a one-week turnaround. Substitutions will be suggested if a product is no longer available.)
Round Wood Plaque
Pallet Wood Star
DecoArt Chalky Gesso (black)
Acrylic Paint (color of your choice)
Paint Brushes
POSCA Paint Pen (white)
2 Eye Hook Screws
Ribbon of your choice
E6000 Glue
Basic Instructions:
Paint the inner part of the wood plaque using a distressed painting technique using two colors. Let dry. Brush on the black Chalky Gesso on the border edge and the “moon” section. Use the white POSCA Paint Pen to make small dots on the moon to give it a sparkling effect.
Insert 2 eye screws on the side of the round plaque. Check our model for placement. Cut the length of ribbon that you’d like to use to hang your plaque, and thread it inside to eye hook screws.
Paint the star with the acrylic paint color of your choice. Let it dry.
Use the white POSCA Paint Pen to write your message on the black border. Make sure it was dry before doing this step.
Use E6000 Glue to attach the star to your round plaque.
Pin it for later: