Transform Your Fall Decor with a Paper-Decorated Pumpkin Pallet: A DIY Guide
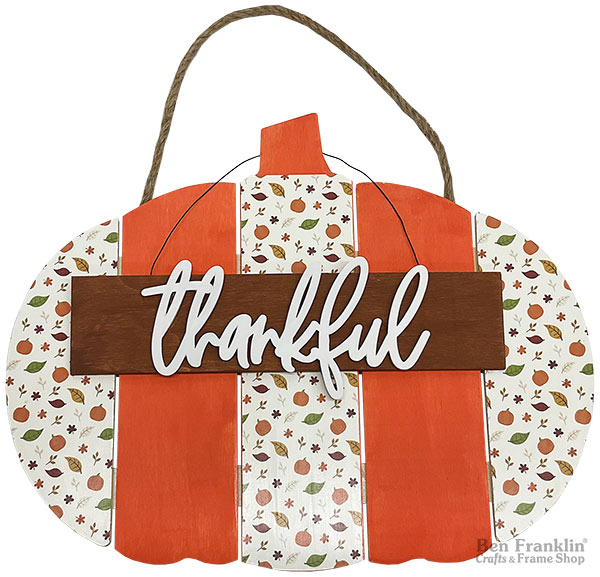
When the leaves start to turn and a gentle chill fills the air, it’s time to cozy up your home with some delightful autumn decorations. At Ben Franklin Crafts and Frame Shop in Bonney Lake and Monroe, WA, we understand the joy of seasonal crafting and the charm of transforming your living space with personalized touches. In this DIY guide, we’re excited to share a simple yet striking project that will infuse the spirit of fall into your home: a Paper-Decorated Pumpkin Pallet using the ever-versatile Mod Podge Medium.
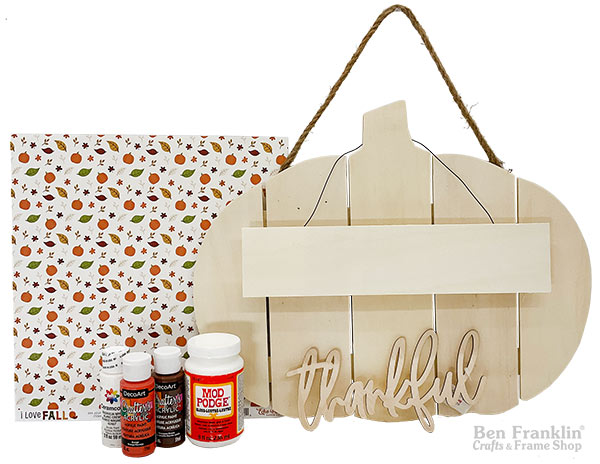
Supplies needed to create a Paper-Decorated Wood Pumpkin Pallet:
(Supplies may vary by store, however, special store-to-store orders can be placed with a one-week turnaround. Substitutions will be suggested if a product is no longer available.)
– Unfinished Wood Pallet Pumpkin Surface
– Rectangular Unfinished Wood Shape
– Your choice of Adhesive
– Your choice of 12”x12” Fall Paper (we recommend browsing our selection in-store for the perfect match)
– Your choice of Acrylic Paint (opt for shades that complement your chosen paper, such as orange, brown, and white)
– ‘Thankful’ Unfinished Wood Cutout
– Mod Podge Medium
– Scissors
– Cutting Board
– Paint Brushes
– Sanding Block
– Pencil

Crafting Your Paper-Decorated Pumpkin Pallet: Step-by-Step Guide
1. Painting the Pumpkin Surface:
Start by selecting a vibrant paint color that resonates with the hues of fall. Consider colors that complement the 12”x12” fall paper you’ve chosen. Once you’ve made your choice, paint the pumpkin surface evenly. Allow it to dry completely.
2. Adding Dimension:
To add depth to your design, paint a small rectangle wood shape brown. This will create an appealing contrast against the vibrant pumpkin backdrop. Let the brown paint dry thoroughly before moving on to the next step.
3. Creating the "Thankful" Centerpiece:
Paint the ‘Thankful’ unfinished wood cutout white. Let it dry completely. Glue it to the center of the previously painted brown rectangle. Allow ample time for the glue to dry.
4. Measuring and Cutting the Paper:
Take your 12”x12” fall paper and carefully cut three slices. Cut two pieces measuring 3.25” x 12” and one measuring 3.5” x 12”. (These pieces will cover the 2 slats on the sides and the one in the middle of your pumpkin pallet).
5. Tracing and Attaching the Paper:
Turn the pumpkin pallet surface over and trace the outer edges onto the 3.25”x12” paper pieces. Repeat this process for the center of the pallet slats using the 3.5”x12” paper piece. Once traced, cut out the excess paper.
6. Bringing it Together:
Brush on some Mod Podge to both the center and outer sections of the pumpkin pallet. Simultaneously, add Mod Podge to the back of your paper pieces.
Gently attach each paper piece to the corresponding sections of the pumpkin pallet. For added durability and a polished finish, consider applying a layer of Mod Podge on top of the paper pieces.
6. Finishing Touches:
Use a sanding block to softly blend the edges of the paper into the surface. This step not only ensures a seamless appearance but also adds a charming rustic touch.
Once everything is dry and secure, step back and admire your handiwork. You’ve crafted a captivating Paper-Decorated Pumpkin Pallet that exudes the warmth and beauty of the fall season.
Visit Us In-Store for Your Crafting Needs
At Ben Franklin Crafts and Frame Shop in Bonney Lake and Monroe, WA, we’re passionate about providing you with the supplies you need to bring your creative visions to life. This Paper-Decorated Pumpkin Pallet project is just one of many possibilities awaiting you in our stores. Remember, the supplies listed above are readily available at our stores (while supplies last), where our friendly staff is eager to assist you in finding the perfect materials for your autumn crafting endeavors. Come on in and explore the endless possibilities of seasonal crafting at Ben Franklin Crafts and Frame Shop!

PIN it!
Don’t forget to save this inspiring project for later by pinning it to your Pinterest board!


