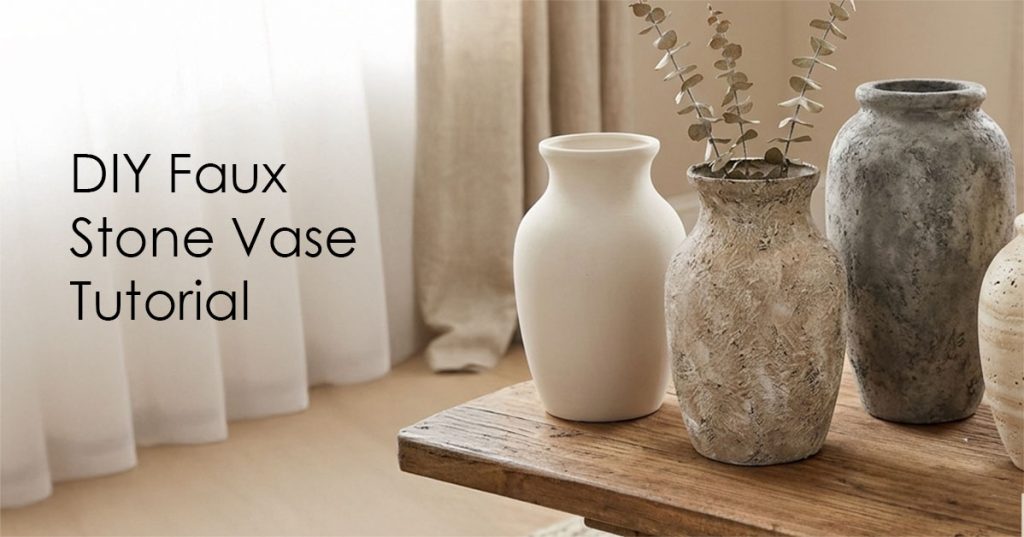
Upcycle a Glass Vase with a DIY Faux Stone Finish
How to Make a DIY Faux Stone Vase at Home
If you love high end home décor but prefer budget friendly projects, this DIY faux stone vase is a must try. This trending technique uses a simple flour and cornstarch mixture with paint to create a realistic stone texture on glass.
Right now, faux stone finishes are everywhere in home styling. You will see them in neutral interiors, modern farmhouse spaces, and minimalist décor. The best part is that you can create the look yourself with supplies you may already have at home.
This DIY faux stone vase technique is beginner friendly and highly customizable.

(Supplies may vary by store, however, special store-to-store orders can be placed with a one-week turnaround. Substitutions will be suggested if a product is no longer available.)
Why Faux Stone Finishes Are Trending
Faux stone décor has gained popularity for good reason. It adds texture, depth, and a natural feel to any space. At the same time, it keeps your color palette soft and neutral.
Unlike real stone, this method is lightweight and affordable. You also have full control over the final look.
For example, you can create:
- A smooth concrete style finish
- A rough stone texture with dimension
- A layered, aged effect using multiple tones
As a result, each piece feels unique and handmade.
If you enjoy textured finishes, you may also like our guide to creating paint pouring art. Learn the basics here.
What You Will Need
Basic Supplies
- Glass vase to repurpose (from your home or garage sale)
- Rubbing alcohol or glass cleaner
- Acrylic paint in neutral tones
- All purpose flour
- Cornstarch
- Water
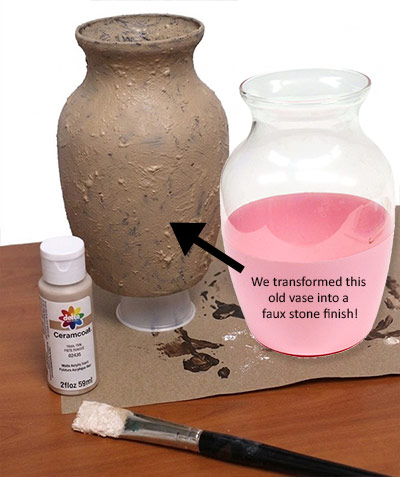
Have an old vase that no longer fits your style or decor, like our pink one shown below? Use this technique to give it a new look!
Tools for Texture and Application
- Paintbrush or sponge
- Mixing bowl
- Craft stick or palette knife
Optional Finishing Supplies
- Matte sealer spray
- Extra acrylic paint for dry brushing
Step 1: Prepare Your Surface
First, clean your old glass vase thoroughly. Use rubbing alcohol or glass cleaner to remove any residue.
This step matters because it helps the mixture stick properly. If the surface is not clean, the texture may slide or crack later.

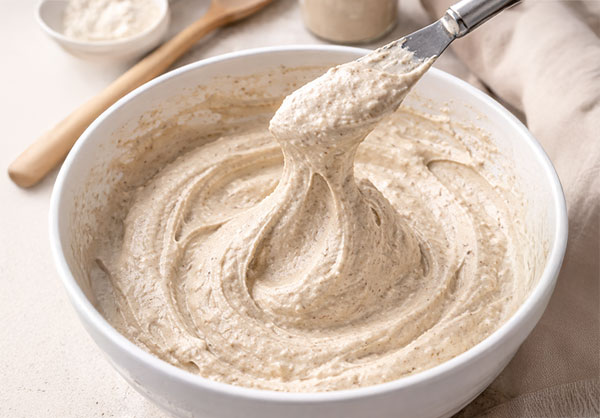
Step 2: Mix Your Faux Stone Base
Next, create your textured mixture.
Combine:
- 2 parts flour
- 1 part cornstarch
- Water until thick
Then, mix in your acrylic paint.
The consistency should feel thick but spreadable. Think of a dense batter that holds its shape when applied.
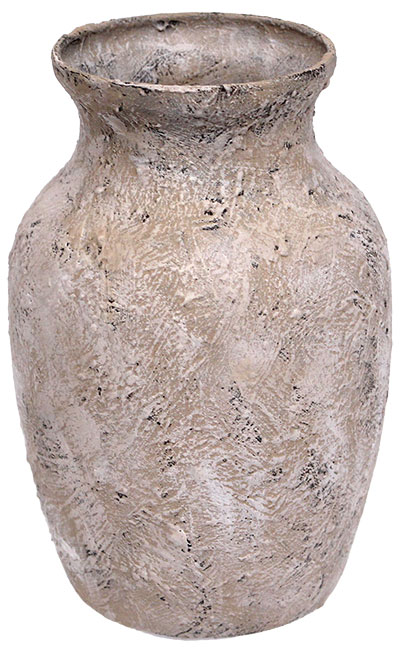
For a natural stone look, start with beige, gray, or off white tones.
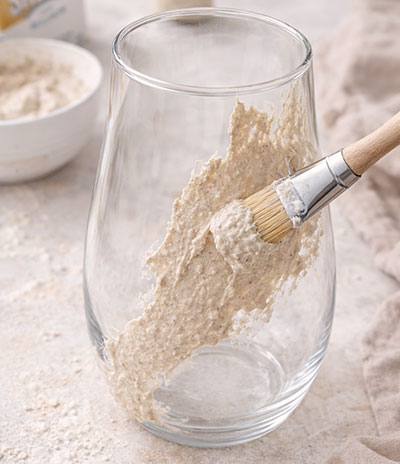
Step 3: Apply the First Layer
Now it is time to build your texture.
Apply the mixture directly onto the vase using a brush or sponge. Do not aim for smooth coverage. Instead, focus on creating variation.
You can dab, swirl, or spread the mixture unevenly. This is what creates the realistic stone effect.
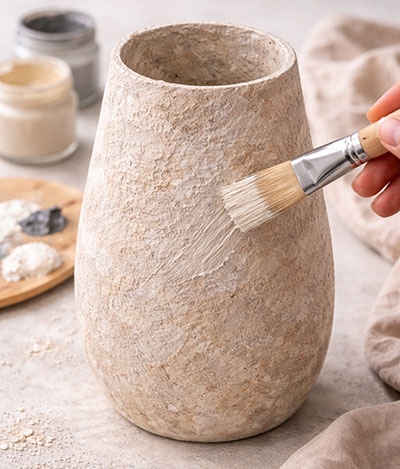
Step 4: Build Dimension
Once the first layer sets slightly, go back and add more texture.
Use a palette knife or brush to create raised areas. You can also tap lightly with a sponge to soften harsh lines.
In addition, vary the thickness across the vase. Real stone is never perfectly even, so imperfections will improve the final result.
Step 5: Let It Dry Completely
Allow your vase to dry fully before moving on. This may take several hours depending on how thick your layers are.
The surface will harden as it dries and begin to resemble real stone.
Step 6: Add Depth with Paint
At this stage, your vase already looks like stone. However, adding depth will take it to the next level.
Use a dry brush technique with a lighter or darker paint color. Gently highlight raised areas to bring out texture.
For a more aged effect, layer multiple tones and blend softly.
Step 7: Seal for Durability
Finally, seal your vase with a matte spray sealer.
This step protects the finish and reduces dusting over time. It also enhances the stone like appearance without adding shine.
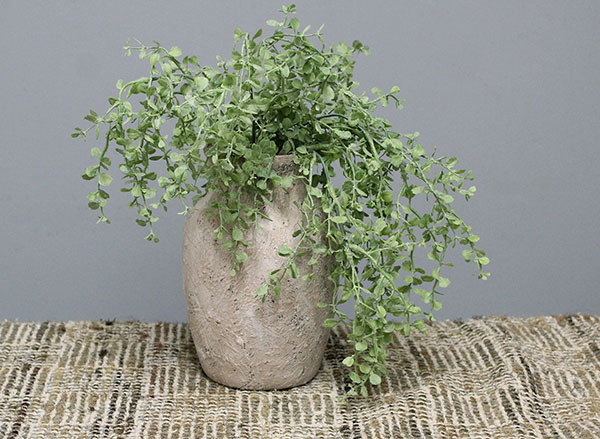
Styling Your DIY Faux Stone Vase
Now that your DIY faux stone vase is complete, it is ready to style.
You can place it:
- On a shelf with books and candles
- On a dining table as a centerpiece
- In an entryway for a natural touch
It pairs beautifully with dried florals, faux stems, or even on its own.
Pro Tips for Best Results
Use Layered Colors: Instead of one flat color, mix subtle variations. This creates a more realistic stone finish.
Work in Sections: Apply and texture small areas at a time. This gives you better control before the mixture starts to dry.
Test First: If you are unsure, try the technique on a small surface first.
Why This Project Works
This DIY faux stone vase project combines affordability with high visual impact. It also aligns with current home décor trends that focus on texture and natural tones.
In addition, it is a great way to upcycle items you already own. Rather than buying new décor, you can transform something simple into a statement piece.
FAQ: DIY Faux Stone Vase
Can you use this technique on other surfaces?
Yes, you can apply this mixture to wood, ceramic, and even plastic surfaces.
How durable is a faux stone finish?
Once sealed, it holds up well for decorative use indoors.
Can I make it waterproof?
Use a strong matte sealer, but this project is best for decorative use only.
Ready to Try It?
Stop by our Ben Franklin Crafts and Frame Shop stores in Bonney Lake and Monroe, WA, to pick up acrylic paints, brushes, and tools for your next project. We are always happy to help you find the right supplies and share tips in person.
📌 PIN IT!
Don’t forget to save this blog post for later by pinning it to your Pinterest board!
🌟 Visit Us to Get Started!
Ready to start crafting? Visit Ben Franklin Crafts & Frame Shop in Bonney Lake or Monroe, WA, to find everything you need. Products may vary.